
Pro Photography Tips to Succeed on Noon Food
Pro Photography Tips to Succeed on Noon Food
Capturing mouthwatering food photography for Noon Food demands more than just pointing your camera at a dish. With intense competition on the Middle East’s premier online food delivery platform, professional-quality images are your golden ticket to attracting hungry customers and boosting sales. These Pro Photography Tips to Succeed on Noon Food will transform your casual snaps into drool-worthy masterpieces that capture attention amidst bustling restaurant listings, effectively showcasing your culinary creations and compelling customers to click “Add to Cart.”
Understanding the Noon Food Platform and Its Visual Demands
Noon Food operates in a highly visual marketplace where speed of decision-making is crucial. Users scroll rapidly, and your images have milliseconds to communicate quality, freshness, and flavor. Unlike static restaurant menus or social media, the platform rewards clarity, vibrant colors, and images that convey texture and temperature. Listings compete directly in search results, making thumbnail appeal absolutely critical. Utilizing high-quality, platform-optimized photography dramatically improves click-through rates and order conversion compared to poorly lit or amateurish snapshots – a cornerstone strategy outlined in these Pro Photography Tips to Succeed on Noon Food.
Understanding Noon Food’s specific technical requirements is paramount. Images typically need to be high-resolution (at least 1000 pixels on the shortest side), perfectly square for thumbnails to render well without awkward cropping, and showcase the food front-and-center against a clean background to ensure visibility on all devices. Prioritizing dishes that photograph well – those with vibrant colors, interesting textures, and clear structure – can give sellers an immediate edge, turning browser curiosity into confirmed orders effectively.
Essential Photography Gear for Stunning Food Images
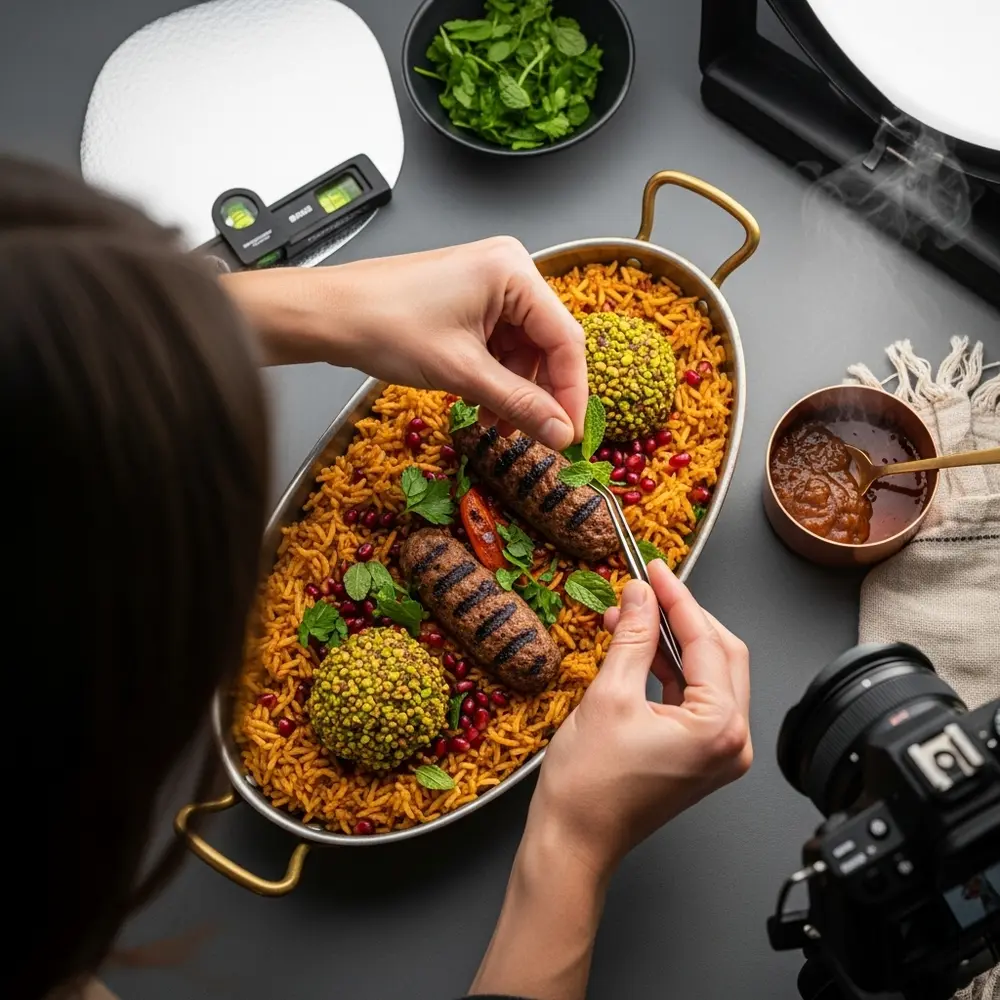
While high-end DSLRs offer maximum control, creating professional Noon Food photography doesn’t necessarily require extravagant investment. Understanding the essential tools helps build a versatile kit. A camera capable of manual settings (a DSLR, mirrorless, or even a high-end smartphone) is fundamental. A versatile prime lens, such as a 50mm f/1.8 or a macro lens (around 100mm), excels for food, offering beautiful background blur (bokeh) and sharp focus on the subject. These lenses enable you to isolate dishes artistically while maintaining critical detail.
Lighting is arguably more important than the camera body. A simple yet powerful setup involves large, diffused light sources like softboxes or even natural light diffused through a sheer curtain or reflector. Using a sturdy tripod eliminates camera shake, essential for tack-sharp focus under soft light and consistent framing when shooting multiple dishes. Reflectors (white foam boards are inexpensive alternatives) bounce light into shadows, reducing harsh contrasts and revealing appetizing details. Investing in a dedicated background platform or textured surfaces separates your dishes cleanly from the environment. For restaurants aiming for peak visual quality, professional photography services often utilize calibrated studio lighting setups.
Mastering Lighting Techniques for Noon Food Photography
Light fundamentally shapes the appeal of food photography. Mastering light transforms a flat image into one that appears dimensional and tantalizing. Side lighting is frequently the most flattering technique for food on platforms like Noon Food. Positioning your main light source (large window, softbox) to the side of the dish creates highlights and shadows that reveal texture – imagine glistening grill marks on meat or the delicate flakiness of pastry being rendered with amazing clarity.
The Power of Diffused Light
Harsh, direct light often creates unappetizing harsh shadows and blown-out highlights. Diffusion scatters light rays, creating a softer, more even illumination that wraps gently around the food. This can be achieved naturally by shooting near a large north-facing window (in the Northern Hemisphere) on an overcast day or artificially using softboxes equipped with inner and outer diffusion layers. The result is smooth transitions between light and shadow, enhancing rather than detracting from the dish’s natural beauty.
Utilizing Reflectors for Balance
When using side lighting, shadows naturally fall on the opposite side of the dish. A white reflector placed opposite the main light source gently bounces light back into those shadows, lifting detail without eliminating necessary depth and dimension. Silver reflectors create a brighter fill with slightly cooler tones, while gold warms up the shadows – choose based on the food’s palette. This simple technique adds vibrance and ensures no part of your delicious creation gets lost in darkness.
Styling and Composition: Making Your Dishes Pop
Food styling enhances reality, making dishes look their absolute best without deception. Focus on freshness: lettuce should be crisp, condensation on a cold drink should look beaded, steam should appear warm from the kitchen (created subtly using specialized steam generators or strategic tweezering). Use sauces and oils sparingly and with intent – a precise drizzle or spoonful placed carefully for visual appeal and flavor suggestion, not messy spills. Sprinkling herbs or spices moments before the shot adds perceived freshness, ensuring they look vibrant and haven’t wilted under the lights.
Composition Techniques for Maximum Impact
Effective composition guides the viewer’s eye straight to the hero dish. The rule of thirds is foundational: mentally divide your frame into a 3×3 grid and place the main subject, or focal point like a grill mark or cherry on top, near an intersection point. Leading lines – a fork pointing towards the plate, a streak of sauce – subtly draw attention towards the food. Negative space (clean, uncluttered background) isolates the dish, preventing distraction and ensuring it dominates the frame. Consider angle: overhead (“flat lay”) works wonders for pizzas or tablescapes; a lower 45-degree angle is classic for burgers or stacked items, highlighting layers; while a direct side angle suits vertical items like sandwiches or drinks. If you need inspiration, review restaurant photography experts’ portfolios to see compositional mastery in action.
Optimizing Images for Noon Food (Technical Aspects)
Perfect in-camera capture is just the start; technical optimization ensures your photos look stunning online. Shooting in RAW format is non-negotiable for professionals. Unlike JPEG, RAW files contain vastly more image data, providing immense flexibility in correcting white balance, recovering blown highlights, or salvaging shadow details during post-processing without degrading image quality – a vital edge in Pro Photography Tips to Succeed on Noon Food.
Perfecting Image Dimensions and File Size
Noon Food generally favors square images (1:1 aspect ratio) that display cleanly in thumbnails and grids. Crop your image accordingly in editing software, ensuring the main subject remains centered and prominent. Resolution should be high, ideally at least 1800×1800 pixels for sharpness across desktop and mobile views, but files should be compressed sufficiently for fast loading – optimize JPGs specifically for the web at a quality setting that balances size and clarity (around 80% quality is often a good start). File names should be descriptive and include keywords (e.g., `slow-roasted-lamb-kofta-noon-food.jpg`) for minor SEO benefits within e-commerce platforms.
Consistent Branding Through Imagery
A cohesive visual identity builds brand recognition on Noon Food. Maintain consistent props, backgrounds (whether a specific marble texture or plain white surface), color grading style (warm-cool-neutral), and composition angle across all dish photos. This repetition makes your listings instantly recognizable during scroll, building trust and perceived professionalism with potential customers browsing the vast marketplace.
Leveraging Smartphone Cameras for Quick and Quality Shots
Modern smartphone cameras are capable of surprisingly professional results with careful use. Maximize control by utilizing third-party camera apps offering manual settings. Manually tap to set and lock focus and exposure (AE/AF Lock on iPhones or similar functions on Android) directly on the food itself. This prevents erratic changes when recomposing a shot. Use Portrait mode judiciously for wider shots with dishes featuring clear foreground separation like a burger on a plate – it creates beautiful background blur. However, avoid it for flat lays or finely detailed foods where auto-edge detection might fail.
Accessories significantly enhance smartphone photography. A small, portable tripod and smartphone holder ensures stability. Clip-on macro lenses allow incredibly detailed close-ups of texture. Gelatinous phone filters act like mini softboxes to diffuse phone flashes effectively. Minimize digital zoom by getting physically closer to the subject whenever possible. Excellent phone shots often come from food photography workshops that teach specific mobile techniques alongside traditional ones. Clean your lens frequently and use gridlines for composition consistency.
Building a Consistent Visual Brand for Your Restaurant
Beyond individual dishes, your restaurant’s *entire* visual presence on Noon Food communicates your brand ethos. Define your core style: bright and airy (light backgrounds, pastel props), dark and moody (richer tones, dramatic shadows), rustic and earthy (wood textures, natural elements), or minimalist and modern (clean lines, monochrome palettes). Apply this chosen style uniformly across all your listings, profile pictures, and promotional banners. Consistency creates a memorable identity, signaling quality and helping customers instantly spot your offerings in the search results.
Utilize props strategically to reinforce your brand personality without overwhelming the food. A branded napkin, a specific style of cutlery, branded sauce bottles, or consistent plating can subtly signal it’s “your” dish. Logowatermarks should be extremely subtle if used, perhaps placed discretely in a corner at minimal opacity, ensuring they don’t distract. Explore menu photography portfolio approaches to see how design elements translate consistently across offerings. Continuously assess competitors’ photography on Noon Food to maintain a distinctive edge while ensuring technical execution remains flawless.
Avoiding Common Food Photography Pitfalls
Even seasoned photographers encounter challenges. Avoid sloppy styling like stray crumbs, fingerprints on cutlery, or messy sauce drips unconnected to intentional plating. Poor white balance creates unappetizing color casts; images may appear unnaturally yellow (too warm), blue (too cool), or green. Always use a manual white balance setting or grey card during capture and fine-tune it meticulously in RAW processing. Incorrect perspective distortion creates unnatural plate shapes; shooting straight-on reduces distortion versus oblique angles.
Over-editing is another major pitfall. Applying excessive sharpening introduces harsh halos. Aggressive saturation makes food look artificial and unnatural, triggering skepticism. Unnatural contrast kills subtle textures that suggest freshness. Strive for realistic perfection – enhancing natural beauty, not creating food that doesn’t exist. Using artificial elements (non-food products simulating steam, glue instead of milk) inevitably breaches consumer trust if discovered. Messy backgrounds with clutter or harsh shadows distract heavily from the subject, undermining perceived value. Avoid these flaws consistently using these essential Pro Photography Tips to Succeed on Noon Food.
Editing Like a Pro: Enhancing Your Food Photos
Professional post-processing elevates good captures to Noon-Food-ready highlights. Start globally: Correct white balance and lens distortion/vignetting first. Ensure precise exposure adjustments – lift shadows judiciously and gently tame highlights to reveal details. Utilize tone curves for nuanced luminosity control over different brightness regions. Apply gentle, natural saturation increases and carefully manage specific colors using HSL panels (boost reds in meats sparingly, mute stray overpowering colors).
Targeted edits are crucial. Local adjustments with brushes or radial filters brighten specific food areas needing emphasis or subtly darken distracting backgrounds. Spot removal eradicates sensor dust spots. Light sharpening applied selectively to main food details enhances perceived clarity. Subtle clarity/texture adjustments can elevate elements like crusts or grains. Finally, maintain realistic integrity – enhancements should feel natural. Mastering these techniques requires practice or leveraging editing and post-production services to achieve consistent, impactful results.
Promoting Your Noon Food Listings with Professional Images
Outstanding photography amplifies promotion. Use your hero shots consistently across all platforms – Instagram posts showcasing menu items should visually match your Noon listings to reinforce recognition, potentially linking directly to your store profile. Feature your best images prominently within Noon Food promotional campaigns to drive engagement. Create visual consistency for specific dish categories or within sponsored placements. High-quality imagery significantly boosts conversion rates within promotions.
User-generated content (UGC) can complement professional photography. Encourage happy customers to share photos using branded hashtags, then feature credible UGC shots alongside professional images (clearly labeled as such) within your Noon Food gallery or social channels. This demonstrates social proof but shouldn’t replace studio-quality shots as your primary visual anchor. Continuously analyze how imagery performs: track click-through rates on listings with different photos, monitor conversion differences for banner images versus lower-quality thumbnails, and solicit direct customer feedback on presentation preferences to refine your visual strategy.
Conclusion: Elevate Your Culinary Presence With Pro Shots
Implementing these Pro Photography Tips to Succeed on Noon Food fundamentally changes how potential customers perceive your restaurant online. Stunning, appetizing photography isn’t just decoration; it acts as your digital menu, conveying quality, freshness, and culinary expertise in a hyper-competitive marketplace. It significantly boosts discovery, builds customer trust, directly drives sales by making dishes irresistible, and builds a recognizable brand instantly associated with excellence. Platforms like ArtSun Studio specialize in creating precisely this level of food imagery.
Dedicate ongoing time and resources to visually showcasing your food professionally. Experiment with lighting setups, refine your styling techniques, master essential editing, and consistently apply your brand’s visual language across every dish. High-quality food photography delivers tangible returns on investment through increased visibility and orders. Embrace it as an indispensable marketing asset essential for dominating your niche on the Noon Food platform and delighting your customers before the food even arrives.

